Service explanation for JA-181M
Wireless magnetic contact
This product is part of the Jablotron 100 series alarm system. It is responsible for the detection of the opening of a door, window, etc. It can also be equipped with an additional sensor, with a normally open or normally closed contact on the output. The detector can also be used to detect the manipulation of a roller shutter, if equipped with a CT-01 gear sensor of roller shutter movement. The signal from the gear sensor is filtered so that small movements of the roller shutter are suppressed during gusts of wind. The JA-181M detector can also be used with an LD-81 flood detector.
Installation
The product must be installed by a trained technician with a valid Jablotron certificate. The detector responds to an increase in distance from the magnet. The electronics are mounted on the fixed part of the door (window) and the magnet on the moving part. We recommend installing the detector vertically. Avoid placing directly on metal parts (these negatively affect the operation of the magnetic sensor and radio communication). If the door (window) is metal, install the wireless detector outside the metal part and use an external magnetic sensor for detection (see external sensor connection).
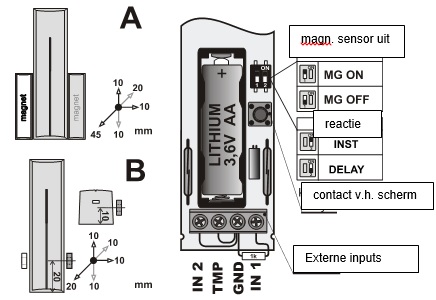
The JA-181M transmitter has two types of magnets available in the set. The standard magnet in a plastic housing (A) and a ring magnet (B) for use when there is a lack of space for mounting, possibly for drilling into a door leaf or window. The correct placement of both magnets is shown in the following images, as well as the detection distances (in millimeters) when the distance of the magnet is increased over three axes of movement.
Installation step by step
1. Open the detector screen (by pressing the click clamp)
2. Screw the plastic back wall to the fixed part of the door (window)
3. Screw the magnet onto the moving part, the distance from the detector may be max. 5mm when the door is closed, the bottom edge of the plastic case of the magnet must fit the bottom edge of the detector screen (magnet can be mounted from the left or right)
4. Leave the battery disconnected and the screen open. Proceed according to the installation manual of the control panel (receiver). Basic steps:
• Switch the control panel to service and switch on learning mode with the 1 key
• Connect the battery to the detector - this will teach it
• End the learning mode with the # key
To comply with the CSN-EN 50131-2-2 standard, the drop-in clamp of the screen must be locked by the supplied screw.
If you are learning the detector in the receiver after the battery has already been connected, first disconnect it, then press and release the screen contact (the residual energy is used up) and only then perform the learning mode.
Adjustment switches
Switch 1: MG ON / MG OFF makes it possible to switch off the internal magnetic sensor in the detector (OFF = sensor off). It is used in the case when only the activation of the external sensor is to be reported (connected to the terminal).
Switch 2: INST / DELAY determines whether the detector is on the access route to the house and provides an exit and entry delay = position DELAY. This setting is only meaningful when used with the Jablotron central unit with the NATUR response set. If a different response is set in the detector control panel, or you are using the detector with a JA-182N or JA-180N receiver, the switch setting has no meaning.
After opening the screen, the detector always responds with a tamper signal.
Detection of opening/closing
The detector has two working modes, indicated by one respectively. The signal light flashes twice when inserting the battery. One flash means that the detector reports opening and closing to the system (factory setting). This way, the status of the window or door can be monitored. Two flashes mean that the detector only reacts when opening (distance increase of the magnet).
To switch modes, press and hold the screen's protective contact switch, insert the battery, and release the switch 3-5 seconds after inserting the battery. The detector then flashes once or twice, depending on the mode just selected.
Connection of external sensors
Other external sensor(s) can be connected to the detector. This way, multiple doors can be monitored simultaneously and other sensors can be followed if necessary. Inputs IN2 and TMP respond to contact closure from the common GND terminal. The IN1 input can be balanced with a 1k resistor or it responds the same way as IN2 after disconnecting GND (automatic detection).
IN 1 input When this input is activated, the detector emits the same signal as when the distance of the magnet is increased. The built-in magnetic sensor can be turned off with switch 1.
The possibility of a balanced input is used when connecting the detector to the make contact of the output. By making contact, the resistance is bridged and thus the activation occurs.
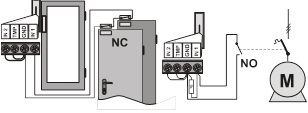
Example of connecting external sensors with a normally open and normally closed contact
IN2 input This input is intended for a signal from the roller shutter sensor (type CT-01). The alarm signal is sent as soon as the contact of the roller shutter detector breaks at least three times within 5 seconds. An accidental contact break (accidental tripping of the roller shutter sensor due to wind) is filtered in this way and no alarm signal is sent. If contact is broken for a period longer than 1s, a tamper alarm is triggered.
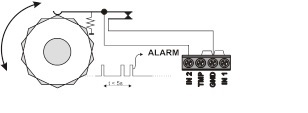
Example of connection of the IN2 input
TMP input – when contact of this input is broken, the detector sends the signal of the screen opening (tamper).
Note: If one of the In or TMP inputs is not used, its terminal must be connected to the GND terminal.
A cable of max. 3m long must be used to connect external detectors.
Test detector
For 15 minutes after closing the screen, the detector indicates activation by means of the signal light. The Jablotron control panel can check the detector signal in service mode, including measuring the signal quality.
Replace the battery in the detector
The system checks the battery status and as soon as it starts to discharge, informs the user (possibly also the service technician). The detector continues to operate and also indicates activation with a short flash of the light. We recommend replacing the battery within 2 weeks. The battery is replaced by the technician in service mode. After replacing the battery, it is recommended to test the operation of the detector.
If a weak battery is installed in the detector, its signal light will flash for approximately 1 minute. Afterwards the detector will work, but will report a discharged battery
Do not throw a used battery into the household waste, but dispose of it with chemical waste.
Remove detector from the system
The system reports any loss of the detector. If you deliberately dismantle the detector, you must also erase it from the control panel.
Technical parameters
Power supply Lithium battery type LS(T)14500 AA (3.6V / 2.4 Ah)
Typical battery life approx. 3 years (max. 20 activations/day)
Communication band 868.1 MHz, Jablotron protocol
Communication range approx. 300m (direct visibility)
Typical off/on distance is allowed. sensor see fig.
Inputs for external sensor IN2 and TMP = break loops
IN1=simple balanced loop
Dimensions, electronics weight: 110 x 31 x 26 mm, 90g
magnet: 56 x 16 x 15 mm
Environment according to EN 50131-1 II. inside, general
Working temperature range -10 to +40 °C
Classification cf. EN 50131-1, EN 50131-2-6, EN 50131-5-3 grade 2
Furthermore complies with ETSI EN 300220, EN50130-4,
EN55022, EN 60950-1
The detector has been designed and manufactured in accordance with the provisions applicable to it: Government Decree No. 426/2000 Coll., provided it is used according to its intended purpose. Original Declaration of Conformity can be found at www.jablotron.cz in the Advice (Support) section.
Note: Although this product does not contain harmful materials, do not dispose of it in the household waste, but hand it in at the collection point intended for electronic waste.
Installation
The product must be installed by a trained technician with a valid Jablotron certificate. The detector responds to an increase in distance from the magnet. The electronics are mounted on the fixed part of the door (window) and the magnet on the moving part. We recommend installing the detector vertically. Avoid placing directly on metal parts (these negatively affect the operation of the magnetic sensor and radio communication). If the door (window) is metal, install the wireless detector outside the metal part and use an external magnetic sensor for detection (see external sensor connection).
The JA-181M transmitter has two types of magnets available in the set. The standard magnet in a plastic housing (A) and a ring magnet (B) for use when there is a lack of space for mounting, possibly for drilling into a door leaf or window. The correct placement of both magnets is shown in the following images, as well as the detection distances (in millimeters) when the distance of the magnet is increased over three axes of movement.
Installation step by step
1. Open the detector screen (by pressing the click clamp)
2. Screw the plastic back wall to the fixed part of the door (window)
3. Screw the magnet onto the moving part, the distance from the detector may be max. 5mm when the door is closed, the bottom edge of the plastic case of the magnet must fit the bottom edge of the detector screen (magnet can be mounted from the left or right)
4. Leave the battery disconnected and the screen open. Proceed according to the installation manual of the control panel (receiver). Basic steps:
• Switch the control panel to service and switch on learning mode with the 1 key
• Connect the battery to the detector - this will teach it
• End the learning mode with the # key
To comply with the CSN-EN 50131-2-2 standard, the drop-in clamp of the screen must be locked by the supplied screw.
If you are learning the detector in the receiver after the battery has already been connected, first disconnect it, then press and release the screen contact (the residual energy is used up) and only then perform the learning mode.
Adjustment switches
Switch 1: MG ON / MG OFF makes it possible to switch off the internal magnetic sensor in the detector (OFF = sensor off). It is used in the case when only the activation of the external sensor is to be reported (connected to the terminal).
Switch 2: INST / DELAY determines whether the detector is on the access route to the house and provides an exit and entry delay = position DELAY. This setting is only meaningful when used with the Jablotron central unit with the NATUR response set. If a different response is set in the detector control panel, or you are using the detector with a JA-182N or JA-180N receiver, the switch setting has no meaning.
After opening the screen, the detector always responds with a tamper signal.
Detection of opening/closing
The detector has two working modes, indicated by one respectively. The signal light flashes twice when inserting the battery. One flash means that the detector reports opening and closing to the system (factory setting). This way, the status of the window or door can be monitored. Two flashes mean that the detector only reacts when opening (distance increase of the magnet).
To switch modes, press and hold the screen's protective contact switch, insert the battery, and release the switch 3-5 seconds after inserting the battery. The detector then flashes once or twice, depending on the mode just selected.
Connection of external sensors
Other external sensor(s) can be connected to the detector. This way, multiple doors can be monitored simultaneously and other sensors can be followed if necessary. Inputs IN2 and TMP respond to contact closure from the common GND terminal. The IN1 input can be balanced with a 1k resistor or it responds the same way as IN2 after disconnecting GND (automatic detection).
IN 1 input When this input is activated, the detector emits the same signal as when the distance of the magnet is increased. The built-in magnetic sensor can be turned off with switch 1.
The possibility of a balanced input is used when connecting the detector to the make contact of the output. By making contact, the resistance is bridged and thus the activation occurs.
Example of connecting external sensors with a normally open and normally closed contact
IN2 input This input is intended for a signal from the roller shutter sensor (type CT-01). The alarm signal is sent as soon as the contact of the roller shutter detector breaks at least three times within 5 seconds. An accidental contact break (accidental tripping of the roller shutter sensor due to wind) is filtered in this way and no alarm signal is sent. If contact is broken for a period longer than 1s, a tamper alarm is triggered.
Example of connection of the IN2 input
TMP input – when contact of this input is broken, the detector sends the signal of the screen opening (tamper).
Note: If one of the In or TMP inputs is not used, its terminal must be connected to the GND terminal.
A cable of max. 3m long must be used to connect external detectors.
Test detector
For 15 minutes after closing the screen, the detector indicates activation by means of the signal light. The Jablotron control panel can check the detector signal in service mode, including measuring the signal quality.
Replace the battery in the detector
The system checks the battery status and as soon as it starts to discharge, informs the user (possibly also the service technician). The detector continues to operate and also indicates activation with a short flash of the light. We recommend replacing the battery within 2 weeks. The battery is replaced by the technician in service mode. After replacing the battery, it is recommended to test the operation of the detector.
If a weak battery is installed in the detector, its signal light will flash for approximately 1 minute. Afterwards the detector will work, but will report a discharged battery
Do not throw a used battery into the household waste, but dispose of it with chemical waste.
Remove detector from the system
The system reports any loss of the detector. If you deliberately dismantle the detector, you must also erase it from the control panel.
Technical parameters
Power supply Lithium battery type LS(T)14500 AA (3.6V / 2.4 Ah)
Typical battery life approx. 3 years (max. 20 activations/day)
Communication band 868.1 MHz, Jablotron protocol
Communication range approx. 300m (direct visibility)
Typical off/on distance is allowed. sensor see fig.
Inputs for external sensor IN2 and TMP = break loops
IN1=simple balanced loop
Dimensions, electronics weight: 110 x 31 x 26 mm, 90g
magnet: 56 x 16 x 15 mm
Environment according to EN 50131-1 II. inside, general
Working temperature range -10 to +40 °C
Classification cf. EN 50131-1, EN 50131-2-6, EN 50131-5-3 grade 2
Furthermore complies with ETSI EN 300220, EN50130-4,
EN55022, EN 60950-1
The detector has been designed and manufactured in accordance with the provisions applicable to it: Government Decree No. 426/2000 Coll., provided it is used according to its intended purpose. Original Declaration of Conformity can be found at www.jablotron.cz in the Advice (Support) section.
Note: Although this product does not contain harmful materials, do not dispose of it in the household waste, but hand it in at the collection point intended for electronic waste.