
Service explanation for JA-80W
1 Installation
The installation may only be carried out by installers who have a certificate issued by a recognized distributor. No obstacles may block the view of the P.I.R. detector protecting the area. Keep the detector away from metal objects that may interfere with radio communications and the microwave area.
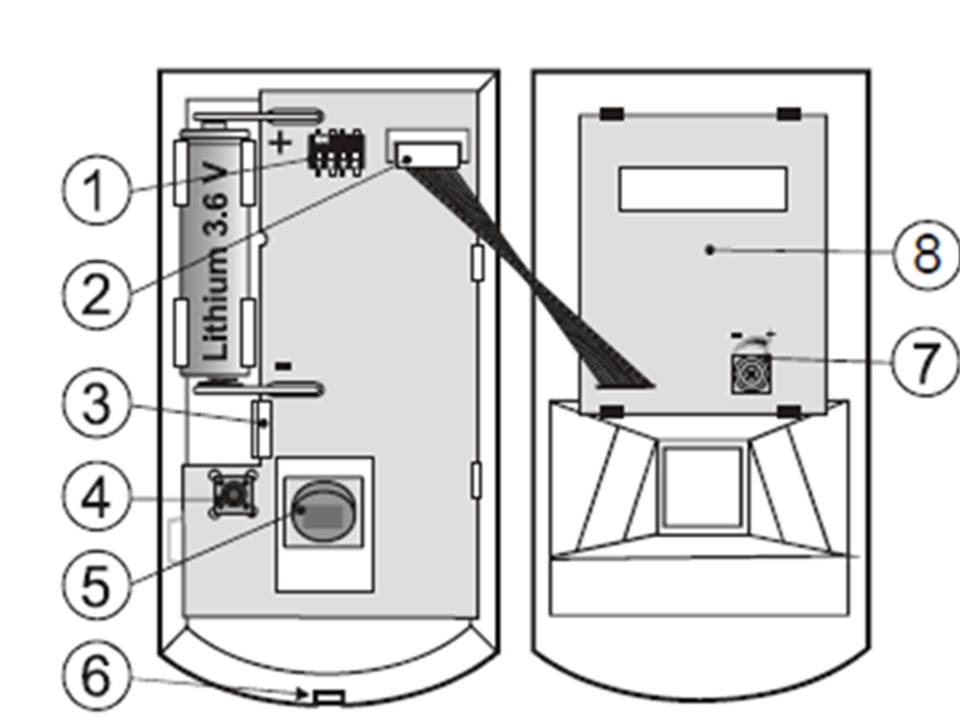
Description: 1. DIP switch; 2. Microwave part connector; 3 PCB tab; 4. Tamper switch; 5. P.I.R. sensor; 6. Front cover tab; 7. Microwave sensitivity setting; 8. Microwave detector
1. Open the detector cover by pressing the tab (6) and remove the PCB
circuit board that is in an internal tab (3) Avoid touching the internal P.I.R.
or damaging the antenna.
2. Drill screw holes through the rear plastic cover according to the installation point, either for a
corner or in front of a wall. At least one screw must penetrate the tamper
sensitive point.
3. Screw the tailgate to the wall approximately 2.5 meters above the floor (vertically, with the
tab down).
4. Returning the PCB to its original position until the tab (3) clicks.
5. With the battery disconnected and the lid open, follow the control panel or
receiver manual.
· Enter the learning mode on the control panel by pressing "1" in the service mode.
· Install a battery in the detector to activate enrollment.
· Exit registration by pressing "#"
6. Close the detector cover until the tab clicks. The included screw can be secured
applied to the tab.
7. After installing a battery in the detector, it only takes three minutes to
stabilize. During this period the LED lights up continuously.
Notes:
To enroll a detector after having already connected a battery, first disconnect the battery and press the tamper switch and release the tamper switch to switch to discharge any remaining voltage for the device ready for enrollment.
The detector can also be enrolled by entering the serial number – the last 8 numbers of the barcode. To comply with EN 50131-2-4 the tab must be secured by the supplied screw.
2 Environment DIP switch
Switch No. 1: DEL/INS: OFF (DEL) provides entry and exit delays for detectors installed in a building entrance. The ON (INS) Activates the detector immediately when the control panel is armed. DIP switch no. 1 only has an effect if the detector gives a natural response that it has in the OASIS control panel. It also has no effect when used with a UC-8x or AC-8x receiver.
Switch No. 2: P.I.R. NORM / HIGH selection of false alarm immunity. The OFF (NORM) position combines very well with fast immunity sensor responses. The ON (HIGH) position provides increased immunity with a slower response time and is only used for problematic installations.
Switch no. 3: Microwave NORM / HIGH sets the period after P.I.R. detection in which the microwave detection is activated. The position OFF – 1 sec, ON – 2 sec.
Switch no. 4: Microwave NORM / TEST the position OFF is for the default function of the detector. The Microwave detection is controlled by the P.I.R. detection part for one or two seconds to switch to No. 3. The position ON – Microwave detection works continuously for test purposes (walk test).
3 Testing the detector
15 minutes after closing the detector, the LED indicators indicate that the detector has been activated. A short flash of the red light indicates the P.I.R. detection confirms movement and a long flash (2 sec.) gives the Microwave detection confirmation of movement. For the proper functioning of the detector, it is essential to set the Microwave detection field to the location that needs to be protected. To set, turn the fourth DIP switch to the test position. Sensitivity (monitoring range) can be adjusted by a potentiometer on a part of the Microwave detection located in the front of the detector. Turning to the right increases the sensitivity (range). Prevent the selection from having too high a sensitivity, if the detection relates to, for example, the environment of the rooms. In general, the Microwave detection field should be the same as that of the P.I.R. detection. After the setting, return the DIP switch to the NORM position. To save energy on the battery, part of the P.I.R. sensor detector switches to energy saving mode, 15 minutes after closing cover. As long as the P.I.R. sensor is in energy saving mode, it still looks out for movement. The first movement is detected and confirmed by the Microwave section and is then immediately signaled in the control panel. For the next 5 minutes the P.I.R. sensor all further movements. After these 5 minutes, the P.I.R. sensor then returns to watch for movement until it is reactivated.
4 Replacing the battery
This detector has two batteries inside that are checked regularly. If one of the batteries has expired, the user or installer will be notified. The detector continues to operate and any movement on the front of the detector is indicated by a short LED flash. The batteries must be replaced within two weeks by a qualified installer. After replacing the battery, test the operation of both sensors.
5 Remove the detector from the system
If a detector is removed, the control panel announces the removal. The detector must be unregistered from the control panel control panel before it is actually removed.
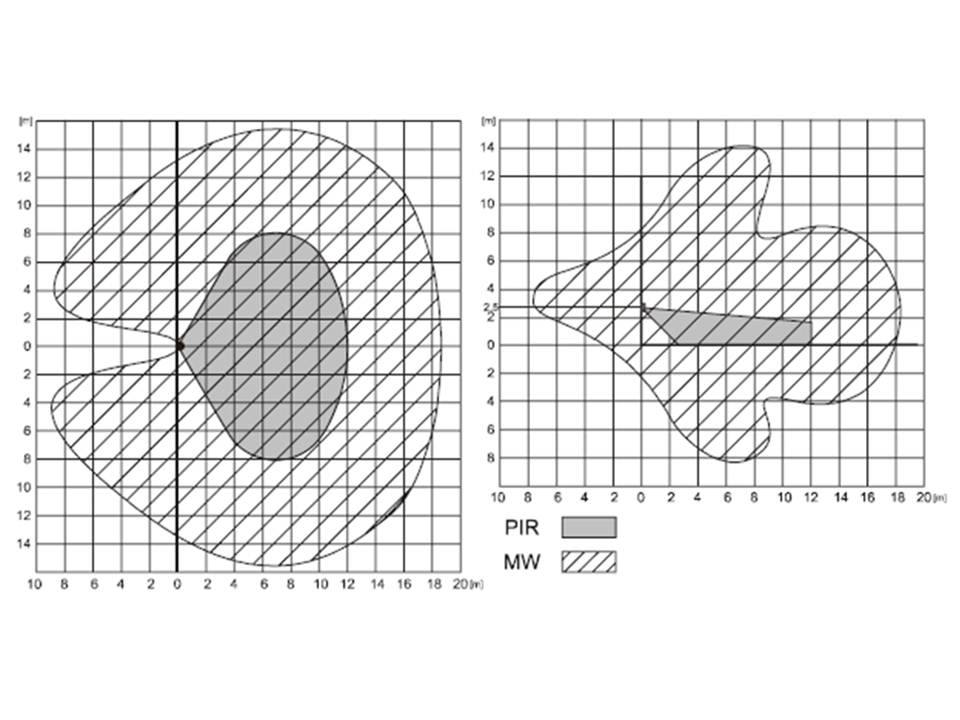
6 Detection features
7 Technical parameters
| Power supply: | Lithium battery type (power source type C) |
| Typical battery life: | approx. 2 years |
| Communication band: | 868MHz, OASIS Protocol |
| Notice: | approx. 300m (open space) |
| Recommended mounting height: | 2.0 to 2.5m above floor level |
| PIR detection angle / detection range: | 110° / 12m (with a basic lens) |
| MW detection range / frequency: | 0.5 to 20m / 9.35 GHz |
| Operational environment according to EN-50131-1: | 2 indoor general |
| Operating temperature range: | -10 to +40 °C |
| Dimensions: | 110 x 60 x 55 mm |
| EN 50131-1, EN 50131-6, EN 50131-5-3 classification: | class 2 |
| Can be operated according to: | ERC REC 70-03 |
Complies with ETSI EN 300220, ETSI EN 300 440-1, EN 50130-4, EN 55022, EN 60950-1